The content of this post is solely the responsibility of the author. AT&T does not adopt or endorse any of the views, positions, or information provided by the author in this article.
In the field of Digital Forensics and Incident Response (DFIR), acquiring a forensic copy of a suspect's storage device is a critical first step. This process involves either disk imaging or disk cloning, each with its own distinct purposes and methodologies. In this blog, we'll delve into the differences between disk imaging and disk cloning, when to use each method, and provide step-by-step guidance on how to create a forensic disk image using FTK Imager.
Disk imaging vs. disk cloning
Disk imaging
Disk imaging is the process of creating a bit-for-bit copy or snapshot of an entire storage device or a specific partition. In forensic imaging, the goal is to create an exact, bit-for-bit copy of the source disk without making any changes to the original data. The key characteristics of disk imaging include:
Non-destructive: Disk imaging is a non-destructive process that doesn't alter the original data on the source device. It preserves the integrity of the evidence.
File-level access: After imaging, forensic examiners can access and analyze the files and folders within the image using specialized forensic software. This allows for targeted analysis and data recovery.
Metadata preservation: Disk imaging retains critical metadata such as file timestamps, permissions, and attributes, which can be crucial in investigations.
Flexible storage: Disk images can be stored in various formats (e.g., E01, DD, AFF) and on different media, such as external hard drives or network storage.
Disk cloning
Disk cloning, on the other hand, involves creating an exact duplicate of the source storage device, including all partitions and unallocated space. Unlike file copying, disk cloning also duplicates the filesystems, partitions, drive meta data and slack space on the drive. The characteristics of disk cloning include:
Exact copy: Disk cloning produces an identical copy of the source device. It replicates everything, including empty space and hidden partitions.
Quick duplication: Cloning is typically faster than imaging because it doesn't involve the creation of a separate image file. It's essentially a sector-by-sector copy.
Cloning is like making an exact photocopy of a book, smudges and all. It copies everything, even the empty pages. So, if we're dealing with a whole computer, it copies the operating system, software, and every file, whether it's useful or not.
Creating a forensic disk image with FTK Imager
FTK Imager is a widely used and trusted tool for creating forensic disk images. Here are the steps to create a disk image using FTK Imager:
Download and Install FTK Imager, make sure to use latest stable version available as well mention the version and vendor details in case notes. This is a good practice in digital forensics and incident response (DFIR) as it ensures that you are using the most up-to-date and secure version of the software, and it provides important documentation about the tools and their configurations used in your investigations. Keeping software updated is essential for maintaining the integrity and reliability of your forensic processes.
Download and Install FTK Imager on your forensic workstation. It can be downloaded from here. You’ll need to provide some information like name, business email etc., and after you fill in the form the download will start automatically. You can use privacy centric services while filling out the information. Begin the installation.
Once, FTK Imager is installed, launch FTK Imager by clicking on the application icon.
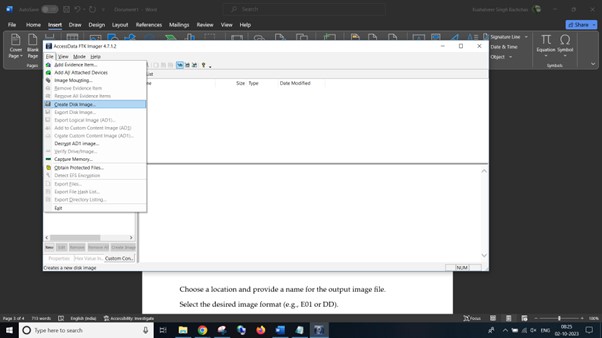
- In the "File" menu, choose "Create Disk Image."
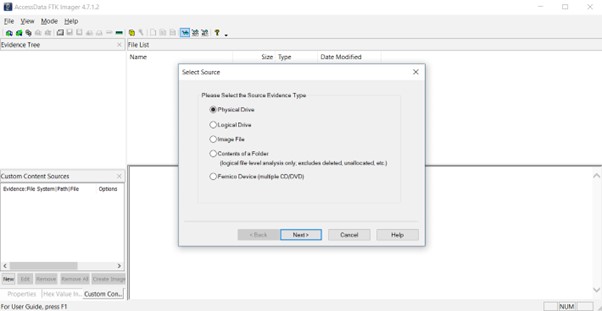
Select the source device (the drive you want to image) from the list.
Specify image destination:
Choose a location and provide a name for the output image file.
Select the desired image format (e.g., E01 or DD).
Configure options:
Configure imaging options such as compression, verification, and hash algorithm as needed.
Start imaging:
Click the "Start" button to begin the imaging process.
FTK Imager will create a forensic disk image of the source device.
Verification and validation:
After imaging is complete, use FTK Imager to verify the integrity of the image using hash values.
Analysis:
Open the forensic image in FTK Imager or other forensic analysis tools to examine the data and conduct investigations.
Remember to follow proper chain of custody procedures, document your actions, and adhere to legal and ethical standards when conducting digital forensics investigations.
Conclusion
In conclusion, the process of acquiring digital evidence in the field of digital forensics is a meticulous and critical endeavor. Whether you choose to clone or image a storage device, each method serves its purpose in preserving the integrity of the evidence.
Cloning, with its ability to create an exact duplicate of a system or drive, is invaluable for scenarios where replication is necessary, such as setting up backup systems or rescuing data from failing hardware. Its speed and precision make it an indispensable tool in the digital investigator's toolkit.
On the other hand, imaging, akin to taking snapshots of the relevant data, excels when you need to preserve evidence in a forensically sound manner. It allows investigators to focus on specific pieces of information without the burden of redundant or irrelevant data.
Whichever method you choose, it's paramount to adhere to best practices, document your actions meticulously, and ensure that the integrity of the original evidence is maintained throughout the process. With a thorough understanding of when and how to employ these techniques, digital forensic experts can uncover the truth while safeguarding the integrity of digital evidence.