This is a guest post James Quinn, a SOC analyst from Binary Defense.
In Part 1 of the Reversing Gh0stRAT series, we talked about a partial Gh0stRAT variant which used an encryption algorithm to hide its traffic. In part 2, we will be talking about a much more complete Gh0stRAT sample which allows a hacker to take total control over a victim’s computer. Additionally, once control is gained, the hacker can use unique commands in this Gh0stRAT sample to Denial of Service (“DDoS”) a target.
Some of the key functionality of the sample includes:
- Webcam Control
- File Manager
- Dial-up/VPN credential theft
- Multithreaded DDOS using TCP/UDP/HTTP/ICMP
- Adding a new net user and installing registry keys for RDP
_(1)_(1)_(1)_(1)_(1)_(1)_(1)_(1)_(1).jpg)
[SCR1] ICMP DDOS from my computer to my other computer. In 30s, 1,237,749 packets were sent with a total of 352Mbits/second.
Additionally, this blog post will also be expanding on my redirection technique, along with more information on how Gh0strat handles commands.
Malware Analysis
On first glance, this sample seems to be a fairly simple and unaltered Gh0stRAT sample. Its strings are not encrypted and it doesn’t use any DLL’s loaded into memory/dropped. In fact, on first glance, you’ll see that its network traffic even contains ‘Gh0st’.
However, it is anything but. It uses unique opcodes, unique commands, and while on first glance the header appears normal, it has actually been modified. Typically, ‘Gh0st’ occurs in the first 5 bytes of the header, before the size fields, not after.
Domains
Interestingly, this sample communicates with its C2 server (z-hacker-y[.]win) over port 22, which is the port typically reserved for SSH. Additionally, this is a dynamic DNS, meaning the IP has changed, however here are some of the IP’s I have seen
- 59.37.6[.]19 (current)
- 185.173.92[.]170
- 43.226.35[.]69
Exploits
Just like in part 1, these were the 2 exploits used to drop the sample on my honeypot:
These 2 exploits are EternalBlue/Doublepulsar and are used to drop the sample onto a system.
Installation
Upon execution, the very first thing the sample does is use its C2 URL to create a mutex (z-hacker-y[.]win). Immediately after that, it obtains the file path of the running process and then saves a registry key to SOFTWARE/Microsoft/Windows/CurrentVersion/Run with the value of NetService.exe and the data set to the path, for persistence.
After that, it pushes the C2 URL and port to the stack and begins attempting to communicate home.
When a connection is established, it gathers:
- Version information
- Socket name
- Processor Count/Write Speed
- System Info
- Memory status
- Version description of capture driver
Additionally, it searches the open processes for executables related to Kaspersky Security and 360 Total Security AntiVirus software.
It packages all of this information into a buffer, compresses it with zlib, and then sends it to the C2 server, after attaching its modified header.
Network Communication
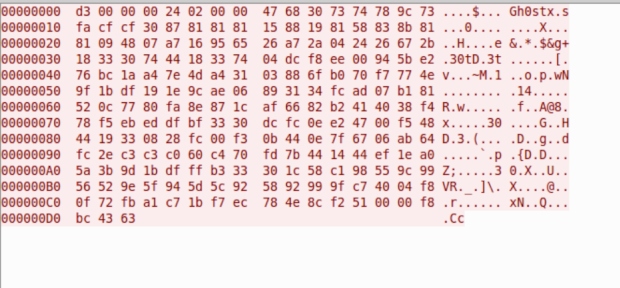
Despite on first glance looking like a generic Gh0stRAT sample’s communication, the packet format has been slightly modified:

Typically Gh0stRAT packets consist of a 5 byte packet header (‘Gh0st’), 4 Bytes of the size of compressed packet, 4 bytes of the size of uncompressed data, followed by the data, in that order. However, as seen above, this sample rearranges the packet format so that the packet header is the last item to occur prior to the data.
Additionally, this sample has unique response opcodes that it sends to the C2:
|
Opcode |
Response type |
|
0x42 |
Implant_Login |
|
0x43 |
Implant_Drive_Response |
|
0x44 |
Implant_File_List |
|
0x45 |
Implant_File_Size |
|
0x46 |
Implant_File_Data |
|
0x47 |
Implant_Transfer_Finished |
|
0x48 |
Implant_Delete_Finished |
|
0x49 |
Implant_Get_Transfer_Mode |
|
0x4B |
Implant_CreateFolder_Finished |
|
0x4C |
Implant_Data_Continue |
|
0x4D |
Implant_Rename_Finish |
|
0x4F |
Implant_Screenspy_Response |
|
0x50 |
Implant_BitmapInfo |
|
0x51 |
Implant_FirstScreen/NextScreen |
|
0x52 |
Implant_Clipboard_Text |
|
0x53 |
Implant_Webcam_Response |
|
0x54 |
Implant_Webcam_Data |
|
0x55 |
Implant_Audio_Manager |
|
0x56 |
Implant_Audio_Response |
|
0x59 |
Implant_ProcEnum_Response |
|
0x5A |
Implant_Windows_List |
|
0x5B |
Implant_Dialupass |
|
0x5C |
Implant_Command_Shell_Response |
Commands
Along with having unique response opcodes, this sample also has 52 different commands, each using their own unique opcode
|
Opcode |
Command |
|
0x08 |
Command_Active |
|
0x09 |
Command_List_Drive |
|
0x0A |
Command_List_File |
|
0x0B |
Command_File_Size |
|
0x0C |
Command_Set_Transfer_Mode |
|
0x0D |
Command_MoveFilePointer |
|
0x0F |
Command_ReadFromOffset |
|
0x10 |
Command_Finish_Transfer |
|
0x11 |
Command_Delete_File |
|
0x12 |
Command_Delete_Directory |
|
0x13 |
Command_File_Work |
|
0x14 |
Command_Create_Folder |
|
0x15 |
Command_Rename_Folder |
|
0x16 |
Command_ShellOpen_Show |
|
0x17 |
Command_ShellOpen_Hide |
|
0x18 |
Command_AddNewNetUser |
|
0x19 |
Command_ScreenSpy |
|
0x1A |
Command_Screen_Reset |
|
0x1B |
Command_Algorithm_Reset |
|
0x1C |
Command_Ctrl_Alt_Del |
|
0x1D |
Command_Control |
|
0x1E |
Command_Block_Input |
|
0x1F |
Command_Blank |
|
0x20 |
Command_Capture_Layer |
|
0x21 |
Command_Get_Clipboard |
|
0x22 |
Command_Set_Clipboard |
|
0x23 |
Webcam |
|
0x24 |
EnableCompress |
|
0x25 |
DisableCompress |
|
0x26 |
Resize |
|
0x27 |
Next |
|
0x28 |
Command_RegAndRestart |
|
0x29 |
Command_DDOSToolTCPUDP |
|
0x2A |
Command_DDOSToolComplete |
|
0x2B |
Command_SendOK |
|
0x2C |
Command_DDOSToolHTTP |
|
0x30 |
Command_Audio |
|
0x31 |
Command_System |
|
0x32 |
Command_EnumProcs |
|
0x33 |
Command_EnumWindows |
|
0x34 |
Command_Dialup |
|
0x35 |
Command_EnumProcAndWindows |
|
0x36 |
Command_Shell |
|
0x37 |
Command_Session |
|
0x38 |
Command_ExitCode |
|
0x39 |
Command_DownAndExec |
|
0x3a |
Command_Server_Update |
|
0x3b |
Command_CleanEvent |
|
0x3c |
Command_Open_URL_Hide |
|
0x3d |
Command_Open_URL_Show |
|
0x3e |
Command_Rename_Host |
Color Key:
Red Commands: Special Commands - Parent
Blue Commands: Special Commands - Child
Green Commands: New Commands
In order to use the special commands, You must first call the Parent command and then call the Child command.
Example: If I want to get the clipboard data of the victim, I would call Command_ScreenSpy followed by Command_Get_Clipboard_Data.
As there are too many individual commands for me to describe the functionality of each command, instead I will do my best to describe the functionality of the new commands (green).
Command_AddNewNetUser: This command is used for maintaining persistence on a victim’s machine. This command takes a couple strings as an argument (like username and password as well as groupname) and then uses NetUserAdd to add a new user account to the machine. Additionally, it uses NetLocalGroupAddMembers to add the user to the group specified.
Command_RegAndRestart: Sets up the Remote Desktop Protocol (RDP) with the following registry key operations
- Netcache is disabled
- AdminTSRemote is enabled
- Remove ShutdownWithoutLogon from the login screen
- Enable terminal Server
- Set TermDD Start key to 2
- Set TermService Start key to 2
- Disable Remote Desktop Connections (Temporary)
- Set RDPTCP port number to 3389
- Set Winstations Terminal server RDP-TCP port to 3389
- Set another TCP port to 3389
- Set keyboard toggle hotkey to option 2
- Enable Remote desktop Connections
Command_DDOSToolTCPUDP: This is the first command that introduces this sample’s unique functionality as a DDOS tool. However, compared to the complete DDoS tool, this command pales in comparison. It allows for 3 different options, a TCP DDoS, a UDP DDoS, and another TCP DDoS.
Command_DDOSToolComplete: This is the main command used for DDoSing servers and allows for 24 different options. Additionally, this tool uses multithreading allowing for multiple attacks to be run at once. Also, based on my observations, using its fastest option (ICMP), it was sending around 42,570 packets per second.
|
Option |
Description |
|
0 |
Send ‘OK’ to C2 |
|
1 |
UDP DDos Attack |
|
2 |
TCP DDoS with spoofed ip |
|
3 |
TCP DDoS attack on port 80 |
|
4 |
ICMP(Ping) Attack |
|
5 |
HTTP DDos attack, no specified user agent |
|
6 |
Close HTTP Connection |
|
7 |
UDP Ddos to supplied IP, then TCP DDoS with spoofed IP. |
|
8 |
Hybrid Attack. First UDP and then ICMP |
|
9 |
Hybrid Attack. First UDP and then TCP |
|
10 |
UDP DDos Attack |
|
11 |
UDP DDos Attack |
|
12 |
UDP DDos Attack |
|
13 |
UDP DDos with Random Data |
|
14 |
UDP DDos with Random Data |
|
15 |
Connect to specific socket and send UDP data |
|
16 |
Connect to specific socket and send TCP data |
|
17 |
HTTP DDoS attack, Windows User agent |
|
18 |
HTTP DDoS attack, Linux User Agent |
|
19 |
UDP DDos Attack |
|
20 |
HTTP DDoS |
|
21 |
RAW Ddos |
|
22 |
TCP DDos |
|
23 |
UDP DDos with Random Data |
|
24 |
HTTP DDoS |
Command_SendOK: Simply sends ‘OK’ to the server
Command_DDOSToolHTTP: Using GET, DDOS supplied IP. Then send ‘OK’ to C2.
Additionally, as a bit of attribution info, each of the commands that open an HTTP connection accept Chinese as a language.
Command and Control Behavior
Prior to the malware author’s move to their current IP, the C2 server was alive and sending commands. When a Gh0stRAT infected machine would attempt to connect to the C2 server, the C2 server would respond with a Command_Active, which puts the Gh0stRAT machine in a state where it can still accept commands, however, it isn’t continually spamming its login packet.
At which point, the server went silent until March 31st, when I began to see a new behavior from this C2 server, and the botnet in general. On March 31st, the C2 Server sent out several Command_DDOSToolComplete’s, with the target being a minecraft server. Based on my observation, they attempted 2 HTTP Floods (One with no user agent specified, and one with the Linux user agent specified) and an ICMP flood. I believe that the attack is still going as of April 4th, as the targeted server is still down.
Using this behavior as an indicator, I believe that the botnet is being used as a DDOS as a Service “(DaaS”) provider.
FakeBot
How did I obtain the above information you might ask? Well, it’s rather simple. Instead of just running the sample and running Wireshark in the background and being patient, I came up with a more elegant solution. Using my redirection technique that was mentioned in part 1 of the blog series, I redirected the sample to my machine in order to grab the correctly formatted login packet.
Then, using Python, I created a socket script that communicates with the C2 server and sends the login packet that I received on my analysis machine. It then listens for commands sent by the C2 Server, and logs any commands to a text file located on the server. All I had to do then was periodically check up on the text file to see if any new additions were added. Additionally, on the C2 server end, my connection looks legitimate, however any attempts to control it will fail.
Mitigation
As with most of the samples I analyze, the best practice to mitigate this sample is to avoid it all together. As this sample uses a relatively old and patched exploit to spread, you’ll need to make sure your machines are updated to the latest software patch. If updating is impossible due to software requirements, I’d recommend closing port 445 on the machine to stop the spread of the malware.
Since this sample is a single stage sample, luckily, you don’t have to deal with multiple dropped payloads scattered all over the device. However, depending on the level of infection, you may or may not have new user accounts added to your system.
In order to discover all user accounts on your system you can use the command net user. This will list all user accounts on your computer. In order to gain more information on a specific user, you can use net user [username], which will allow you to see (among other things), the last time they logged in along with group membership.
Additionally, if infected, the installation folder may vary from system to system. The best way to identify both the installation folder and filename, you should open registry and navigate to the HKLM/SOFTWARE/Microsoft/Windows/Current Version/Run key and write down the install path for the value NetService.exe. You should then delete both that value, along with the file referenced in the install path.
IoCs
|
Sample |
MD5 |
Size |
C2 |
IOC |
|
NetService.exe |
63cfc1680284422620cb966af8e9f167 |
122KB |
z-hacker-y.win:22 |
SOFTWARE/Microsoft/Windows/Current Version/Run/NetService.exe
Traffic to C2 server |
rule Gh0stRAT_DDOS_Variant {
meta:
description = "Gh0stRAT Variant"
author = "James Quinn @LazyActivist192"
date = "2019-04-05"
hash1 = "f1cd38bbb504b38d115b5c127afa913572cef4233395416b5b08aff5f718cfea"
strings:
$s1 = "User-Agent:Mozilla/4.0 (compatible; MSIE 6.00; Windows NT 5.0; MyIE 3.01)" fullword ascii
$s2 = "User-Agent:Mozilla/4.0 (compatible; MSIE 7.00; Windows NT 5.1; MyIE 3.01)" fullword ascii
$s3 = "User-Agent:Mozilla/4.0 (compatible; MSIE 6.0; Windows NT 5.1; SV1)" fullword ascii
$s4 = "User-Agent:Mozilla/5.0 (X11; U; Linux i686; en-US; re:1.4.0) Gecko/20080808 Firefox/8.0" fullword ascii
$s5 = "aPPLICATIONS\\IEXPLORE.EXE\\SHELL\\OPEN\\COMMAND" fullword ascii
$s6 = "NetService.exe" fullword ascii
$s7 = "MSVCP60.dll" fullword ascii
$s8 = "\\CMD.EXE" fullword ascii
$s9 = "360tary.exe" fullword ascii
$s10 = "MFC42.DLL" fullword ascii
$s11 = "%s\\SHELL\\OPEN\\COMMAND" fullword ascii
$s12 = "360sd.exe" fullword ascii
$s13 = "Winlogon" fullword ascii
$s14 = "system\\cURRENTcONTROLsET\\sERVICES\\%s" fullword ascii
$s15 = "SYSTEM\\CurrentControlSet\\Services\\TermService" fullword ascii
$s16 = "SYSTEM\\CurrentControlSet\\Control\\Terminal Server\\WinStations\\RDP-Tcp" fullword ascii
$s17 = "SYSTEM\\CurrentControlSet\\Control\\Terminal Server\\Wds\\rdpwd\\Tds\\tcp" fullword ascii
$s18 = "Mozilla/4.0 (compatible)" fullword ascii
$s19 = "SYSTEM\\CurrentControlSet\\Services\\TermDD" fullword ascii
$s20 = "SYSTEM\\CurrentControlSet\\Control\\Terminal Server\\RDPTcp" fullword ascii
condition:
uint16(0) == 0x5a4d and filesize < 400KB and
( pe.imphash() == "90951b36f29a0f78c9e88cebc58ea5a6" or 8 of them )
}