 Role Availability Role Availability
|
 Read-Only Read-Only
|
 Investigator Investigator |
 Analyst Analyst
|
 Manager Manager
|
The "HIPAA A03 §164.308(a)(1)(ii)(A) - Does your practice categorize its information systems based on the potential impact to your practice should they become unavailable?" report generated from this template provides a risk analysis that is the process of identifying the risks to system security and determining the likelihood of occurrence, the resulting impact, and the additional safeguards that mitigate this impact. Part of risk management and synonymous with risk assessment. Consider whether your practice categorizes its information systems as high, moderate or low impact systems. Consider that information system categorization helps your practice to scope audits and prioritize investments for security mitigation. Consider whether your practice’s risk analysis is designed to protect its information systems and ePHI that it processes, stores, and transmits from unauthorized access, use, disclosure, disruption, change, or damage. Consider whether your practice’s risk analysis: Identifies threats. Identifies vulnerabilities inherent in its technology, processes, workforce, and vendors. Contemplates the likelihood of occurrence. Estimates the potential magnitude of harm.
This report shows the asset groups list by using the "HIPAA A03 §164.308(a)(1)(ii)(A) - Does your practice categorize its information systems based on the potential impact to your practice should they become unavailable?" view.
To generate the HIPAA A03 §164.308(a)(1)(ii)(A) report
- Go to Reports > Compliance Templates.
- Click Generate Report on the specific line for this report.
The Configure Report dialog box displays.
- Click Edit Filters if you want to modify the selected filters, and then Continue to Filters. Do the modifications you need, and then click Edit Report.
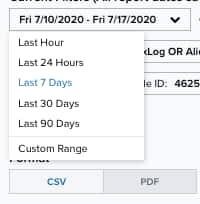
- Click the date field if you want to choose a different date range.
- Under the Format section, select either CSV or PDF for the format of the report.
- Select if you want to generate the report again, and choose Never, Daily, Weekly, Bi-weekly, and Monthly.
- Enter an email address to send the report. Select the Send to my Email Address option to add your email automatically.
- Select the Enable link expiration option. This link is delivered by email and expires in 14 days.
- Click Next.
- In the Report Name field, enter a name for the report. This name will be displayed in the Saved Reports page.
- (Optional.) Add a description that will be included.
- Under the Number of records section, choose the maximum number of records to include on the report: 20, 50, 100, 500, 1000, or 2500.
- If you have chosen the PDF format, you will see the Graphs section, which you can use to include additional views. You can add or remove graphs included in the report by clicking the
and the
icons.
- Select Save & Run if you wish to keep the report in your Saved Reports on USM Anywhere page and receive the report in the indicated email.
- Click Run to run the report.

Choose Last Hour, Last 24 Hours, Last 7 Days, Last 30 Days, Last 90 Days, or Custom Range to set a particular date range.
 Feedback