| Applies to Product: |
|
|
USM Appliance All-in-One comes with six network interfaces, numbered eth0 to eth5. USM Appliance uses these interfaces to perform the following functions:
- Connect to the Internet
- Monitor the network, using its built-in IDS capabilities
- Run asset scans
- Collect log data from your assets
- Run vulnerability scans
- Generate network flows
Based on functionality, you can classify the interfaces into the following categories:
By default, USM Appliance uses the management interface to perform network monitoring, log collection, and scanning. So, for this reason, you do not need to configure any additional interfaces, as long as they are all on the same subnet as the management interface.
The management interface lets you communicate with the LevelBlue console, as well as connect to the web UI.
Note: The default port for the management interface is eth0. However, you may configure a different port for this interface, if desired.
When the administrator configures an interface for network monitoring, the interface operates in passive listening mode (also known as promiscuous mode). A network tap or span is set up that allows the interface to monitor all packet traffic passing through it for threats.
Because USM Appliance's built-in IDS capability uses the network monitoring interface, you must dedicate at least one of the network interfaces to it.
You use the Log Collection and Scanning interface to reach the networks and systems from which you want to collect data. You also use it to scan the systems, using USM Appliance's built-in asset discovery, vulnerability assessment, and availability monitoring tools.
Setting up this interface requires assignment of an IP address and network mask to the interface.
This is the default option for all the interfaces except the management interface. It applies to any network interface that is not in use and not configured.
Update Management Interface Configuration
You must configure the management interface immediately after deploying the USM Appliance virtual machine or the first time when you power on the USM Appliance hardware. See Set Up the Management Interface for details.
If you need to modify the management interface configuration, follow the steps below.
-
Connect to the LevelBlue Console through SSH and use your credentials to log in.
The LevelBlue Setup menu displays.
- Select System Preferences.
- Select Configure Network.
-
- Use the keyboard arrow keys to move to the interface, select the interface by pressing the spacebar, and then press Enter (<OK>).
- Type the IP address and press Enter.
- Type the Netmask for the network and press Enter.
- Type the Gateway for the network and press Enter.
- Press <Back> until you are on the LevelBlue Setup menu again. Select Apply all Changes.
-
Press <Yes> to confirm.
USM Appliance applies the changes and restarts all the services, which may take several minutes.
Configure Additional Network Interfaces
In addition to providing network connection, the management interface on USM Appliance can also monitor your network and collect logs from your assets. But if you want to use a different interface with a different IP address to perform those functions, you must configure those interfaces separately.
To set up additional network interface
-
Connect to the LevelBlue Console through SSH and use your credentials to log in.
The LevelBlue Setup menu displays.
- Select System Preferences.
- Select Configure Network.
-
- Use the keyboard arrow keys to move to the interface, select the interface by pressing the spacebar, and then press Enter (<OK>).
- Type the IP address and press Enter.
- Type the Netmask for the network and press Enter.
- Press <Back> until you are on the LevelBlue Setup menu again. Select Apply all Changes.
-
Press <Yes> to confirm.
USM Appliance applies the changes and restarts all the services, which may take several minutes.
Enable Additional Listening Interfaces
If you want to use different interfaces to monitor network traffic but do not want to assign IP addresses to them, you can enable them in promiscuous mode.
To enable additional listening interfaces on USM Appliance All-in-One or USM Appliance Sensor
-
Connect to the LevelBlue Console through SSH and use your credentials to log in.
The LevelBlue Setup menu displays.
- Select Configure Sensor.
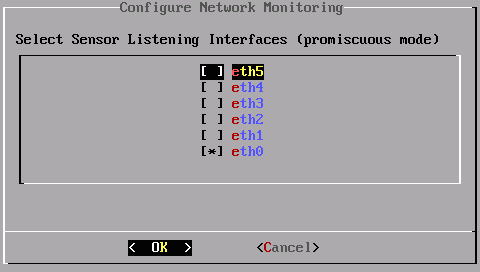
- Select Configure Network Monitoring.
-
Use the keyboard arrow keys to move to the interface, select the interface by pressing the spacebar, and then press Enter (<OK>).
- Press <Back> until you are on the LevelBlue Setup menu again. Select Apply all Changes.
-
Press <Yes> to confirm.
USM Appliance applies the changes and restarts all the services, which may take several minutes.
 Feedback