| Applies to Product: |
|
|
USM Appliance comes with over 4,500 built-in directives, written by the researchers in the LevelBlue Labs™. LevelBlue recommends that you learn how these directives work, and then tailor them to your specific needs.
For example, you might want to detect dropped packets going to a single host on a firewall. In the built-in directives, such a directive exists, which detects dropped packets on the Cisco PIX firewall. However, in order to detect dropped packets on a different firewall, for instance, the Fortinet FortiGate firewall, you need to customize the directive.
In this topic, we use this example to show the steps required to modify a built-in directive. It involves the following 4 tasks:
To clone an existing directive
- Go to Configuration > Threat Intelligence, and then click Directives.
- To find the appropriate directive, type "packets" in the search box.
- Scroll down on the page to locate the directive titled AV Network attack, too many dropped inbound packets from DST_IP.
- Click the clone icon (
 ) to clone the directive.
 -
Click YES to confirm when prompted.
The cloned directive appears in the User Contributed category.
To edit the cloned directive
-
Click the pencil icon (
 ) to the left of the directive.
A pop-up window appears displaying the global properties of the directive.
- Change the name to "AV Network attack, too many dropped on Fortigate".
- (Optional) Modify the taxonomy and/or priority of the directive.
- Click Save. You may need to scroll down to reveal the button.

Now, you need to edit the correlation rules so that they match the events from the Fortinet FortiGate firewall.
To edit the correlation rules
- Click the black triangle to the left of the directive to display the correlation rules.
-
In the first rule (first line in the table), under the Data Source column, click the green plus (+) sign to the left of cisco-pix.
The Rule Data Source Configuration window displays.
- To find the Fortigate plugin, type "fortigate" in the search box.
- To select that plugin, click Fortigate.
-
In Plugin Signatures, to search for the event type(s) that detects dropped packets, type "drop" in the search box.
3 - Fortigate: Drop Forbidden Traffic lists in the right column.
-
To select the event type identified, click the plus (+) sign to the right of the event type, or click Add all.
The event type moves to the left column.
- Click Finish.
-
For the remaining rules in the directive, do one of the following to select the same event type:
- Repeat step 2 to 6, and then click Selected from List.
- Repeat step 2 to 4. In Plugin Signatures, click Plugin SID from rule of level 1.
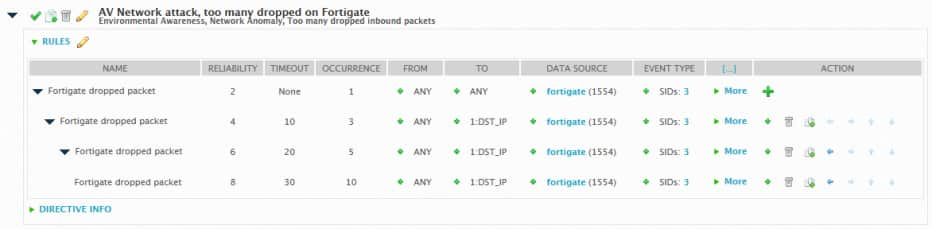
The final directive should look like this:
You may edit other attributes of the correlation rules, if you want.
To change the Name, Reliability, Timeout, or Occurrence attributes
- Click the value.
- Make the changes inline, and then click OK.
To change the From or To attributes
- Click the green plus (+) sign.
- Make changes in the pop-up window. Notice Source Host and Source Port on the left, Destination Host and Destination Port on the right.
- Click Modify.
To change the Data Source or Event Type attributes
- Click the green plus (+) sign.
- Repeat step 2 to step 8 in this task.
To apply all the changes made
- Click Reload Directives. The text displays in red, suggesting an action.
-
Click Yes to confirm when prompted.
This step does not restart USM Appliance; it restarts the ossim-server process running on USM Appliance.
Note: By default, USM Appliance disables the built-in directive automatically after it is cloned. If you want both directives working at the same time, make sure to enable the built-in directive before performing Task 4.
 Feedback