| Applies to Product: |
|
|
Sometimes, you may find that none of the built-in directives work in your environment because they do not have the correct conditions defined. In this case, you can create a new directive from scratch. Let’s see how it works by going through an example.
In this example, we create a custom directive to detect a Denial of Service (DoS) attack that seeks to exhaust a service running on TCP port 139 on a specific server. Many connections from a single host (possibly with bad reputation) to the destination server on port 139 may indicate such an attack. We can check firewall events for connections to the server and trigger an alarm after the correlation engine detects that the number of connections is dangerously high.
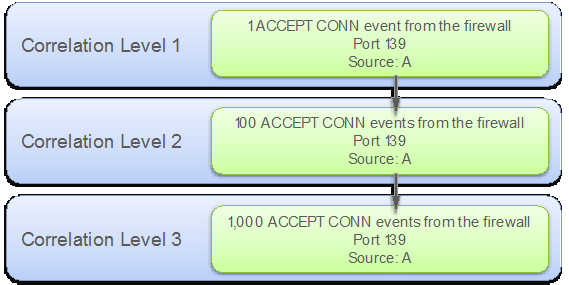
The following diagram shows the three correlation levels we plan to use in the directive. The three correlation rules check for the number of connections to the server using a detector plugin. Every time a rule in the correlation directive matches an event, the reliability of the directive event increases, thus increasing the risk of the event.

Correlation levels used by the sample directive
Follow the tasks below to create this directive.
To create a new directive
- Go to Configuration > Threat Intelligence, and then click Directives.
-
Click New Directive.
A pop-up window appears displaying the global properties of the directive.
-
Fill out the form as below
- In Name for the directive, Type "DoS Attack at NetBIOS".
- In Intent select "Delivery & Attack".
- In Strategy select "Denial of Service – Resource exhaustion".
- In Method, type "Attack".
- Leave the Priority at the default value, which is 3.
-
Click Next.
The New Directive window displays.
This task adds a level 1 rule for the directive created in Task 1. In this rule, we try to match one Cisco ASA Access Permitted event on a particular server on port 139.
To add a level 1 rule
- In Name for the Rule, type "Established connections", and then click Next.
- In Rule name > Plugin, type "cisco-asa" in the search box, and then click Cisco-ASA.
-
In Rule name > Plugin > Event Type,
-
In Rule name > Plugin > Event Type > Network,
-
Select your server from the Assets list under Destination Host / Network.
The server appears in Destination.
Note: Leave Source Host / Network and Source Port(s) empty, which means any asset.
-
In Destination Port(s), type "139".
-
(Optional) To specify IP reputation parameters, click the green triangle next to Reputation options, change No to Yes, and then select the Min Priority and Min Reliability values.
Note: For details on IP reputation, see OTX IP Reputation.
- Click Next.
-
-
In Rule name > Plugin > Event Type > Network > Reliability, click 1.
Note: We choose a low reliability value because typically the level 1 rule detects that a certain event occurs, but it is not necessary to generate an alarm.
-
Click Finish.
The New Directive window closes.
In this task, we try to match the same events selected in Task 2. We want to use the
- same event types
- same source and destination IP addresses
- same destination port
But we want to detect 100 such events instead of 1.
To add a level 2 rule
-
Click the green plus (+) sign at the right side of the first rule, under the Action heading.
The New Rule window displays.
- In Name for the Rule, type "Established connections", and then click Next.
- In Rule name > Plugin, type "cisco-asa" in the search box, and then click Cisco-ASA.
-
In Rule name > Plugin > Event Type, click Plugin SID from rule of Level 1.
This selects the same event types as in the level 1 rule.
-
In Rule name > Plugin > Event Type > Network,
-
In Source Host / Network, under From a parent rule, select "Source IP from level 1".
This selects the same source IP address as in the level 1 rule.
- Leave the Source Ports empty.
-
In Destination Host / Network, under From a parent rule, select "Destination IP from level 1".
This selects the same destination IP address as in the level 1 rule.
-
In Destination Port(s), under From a parent rule, select "Destination Port from level 1".
This selects the same destination port as in the level 1 rule.
-
-
In Rule name > Plugin > Event Type > Network > Reliability, click +2.
Note: In this step, you can either choose an absolute value (left column) or a relative value (right column). If you select a relative value, as we did, USM Appliance adds the value to the reliability set in the previous rule.
-
Click Finish.
The New Directive window closes.
- In the Timeout column, click "None" in the second rule, type "30" (seconds), and then click OK.
-
In the Occurrence column, click "1" in the second rule, type "100", and then click OK.
This task is a repeat of Task 3. You can repeat this task as many times as necessary. In this example, we want to add another rule (level 3) to detect the same event as in the previous rule but with 1000 occurrences.
To add the level 3 rule
To apply all the changes made
- Click Reload Directives. The text displays in red, suggesting an action.
-
Click Yes to confirm when prompted.
This step does not restart USM Appliance; it restarts the ossim-server process running on USM Appliance.


 Feedback