| Applies to Product: |
|
|
The USM Appliance Standard Server is the first USM Appliance component that you must configure for HA.
See also Example: Configuring High Availability for USM Appliance Standard Servers.
You must first deploy and configure the node you intend to act as the passive node, or slave. You configure the active, or master, node, second. Both procedures appear below.
Configuring the Secondary Standard Server for HA
To configure HA in the secondary server
- Log into the secondary (slave) Standard Server.
- From the LevelBlue Setup Main menu, select Jailbreak System and press Enter (<OK>).
- Press Enter (<Yes>) to continue.
-
When you see the command line prompt, access and edit the file /etc/ossim/ossim_setup.conf as indicated in the angle-bracketed variables below:
ha_heartbeat_start=yes
ha_local_node_ip=<slave_appliance_IP>
ha_other_node_ip=<master_appliance_IP>
ha_other_node_name=<master_appliance_name>
ha_password=<password>
**This password must be the same for both slave and master.**
ha_role=slave
ha_virtual_ip=<virtual_IP>
Important: The ha_role value must always equal "slave" for the secondary node.
- Save the changes.
-
Enable HA in the slave by entering the following command:
screen alienvault-ha-assistant -e
Note: Use screen to keep the process running in the background even when the session disconnects.
-
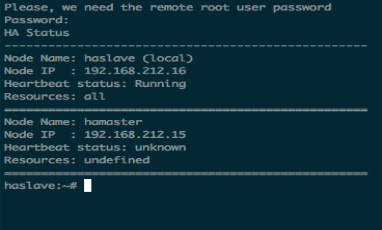
Check that the secondary node is up and running by entering:
alienvault-ha-assistant –s
-
When prompted, enter the remote (master) root user password.
After about five minutes, you see the following output:

-
Configuring the Primary Standard Server for HA
To configure HA in the primary server
- Log into the primary (master) Standard Server.
- From the LevelBlue Setup Main menu, select Jailbreak System and press Enter (<OK>).
- Press Enter (<Yes>) to continue.
-
When you see the command line prompt, access the file /etc/ossim/ossim_setup.conf and edit it as indicated within the angle-bracketed variables, as shown below:
ha_heartbeat_start=yes
ha_local_node_ip=<master_appliance_IP>
ha_other_node_ip=<slave_appliance_IP>
ha_other_node_name=<slave_appliance_name>
ha_password=<password>
**This password must be the same for both slave and master.**
ha_role=master
ha_virtual_ip=<virtual_IP>
- Save the changes.
-
Enable HA in the primary (master) node:
screen alienvault-ha-assistant -e
Note: Use screen to keep the process running in the background even when the session disconnects.
This outputs the following:

-
Check that the primary node is up and running:
alienvault-ha-assistant –s
-
When prompted, enter the remote (slave) root user password.
- Launch a web browser and verify that you can access the USM Appliance system, using the HA virtual IP specified in the ossim_setup.conf file.
After about five minutes, you see output confirming that the node is running.
 Feedback