Manually Create and Configure an Export Sink for Your GCP Sensor
The export sink is what defines which logs are exported to a particular topic. You can create a single sink to export all the logs you want your to receive. Or you can create any number of individual sinks to group your exported logs by type, to maximize performance, or for any other reason that suits your specific implementation.
To create an export sink for a project or organization
- Log in to your GCP environment and go to the organization or project for which you want to create this sink.
- Go to the Logs Router page under Logging.
- Click Create Sink.
- Enter the following information:
- Sink details: Enter an identifiable name for this export sink and a description, and then click Next.
- Sink Destination: Using the drop-down list, select the topic you created for this sink. Select a Cloud Pub/Sub topic, and then click Next.
- Choose logs to include in sink: Create an inclusion filter to determine which logs are included in logs routing sink, and then click Next.
- (Optional.) Choose logs to filter out of sink: Create exclusion filters to determine which logs are excluded from logs routing sink. And then configure a filter for this sink, following the guidelines in Configuring Export Sink Filters.
Note: If you haven't yet created a topic for this sink, you can select Create a topic to create one from this page and immediately use it for your sink. If you do so, you must remember to go to that topic and create a subscription for it or your sensor will not receive any logs from it.
- Click Create Sink.
Important: If your sink and topic are in different GCP projects, or if you are exporting organization-level logs to a Google Cloud Pub/Sub topic in a project, you must complete some additional steps. See the following sections for detailed instructions regarding those two cases.
To create a sink that publishes to a Cloud Pub/Sub topic in a different project
Note: If you have not already granted your service account permission to this second project, first use the instructions in Preparing Your GCP Environment for Sensor Deployment to grant permission to this project now. Be sure to restart the sensor app before proceeding on to step one.
- Log in to your GCP environment and go to the project for which you want to create this sink.
- Go to the Logs Router page under Logging.
- Click Create Sink.
- Enter the following information:
- Sink details: Enter an identifiable name for this export sink and a description, and then click Next.
Sink Destination: Using the drop-down list, select Cloud Pub/Sub topic, and select a Cloud Pub/Sub topic, and then click Next.
Note: If you haven't yet created a topic for this sink, you can select Create a topic to create one from this page and immediately use it for your sink. If you do so, you must remember to go to that topic and create a subscription for it or your sensor will not receive any logs from it.
When you make your selection in Sink Destination, the menu item transforms into a text field. Use that field to enter the following, substituting your relevant information where there are variables:
pubsub.googleapis.com/projects/<project-id>/topics/<topic_name>
Where the <project-id> you reference is the project your topic resides in.
- Choose logs to include in sink: Create an inclusion filter to determine which logs are included in logs routing sink, and then click Next.
- (Optional.) Choose logs to filter out of sink: Create exclusion filters to determine which logs are excluded from logs routing sink. And then configure a filter for this sink, following the guidelines in Configuring Export Sink Filters.
- Click Create Sink.
To create a sink to publish from an organization to a topic in a project
Important: Unlike the previous methods, it is not possible to use the web user interface (UI) to create an export sink to publish from the organization level to a topic at the project level. Instead, use the Google Cloud Shell Editor native to your GCP environment to enter the following commands.
-
Access the Cloud Shell editor in your GCP environment by clicking the Activate Cloud Shell button.
This opens a new window at the bottom of your screen, which may take a few minutes to finish loading.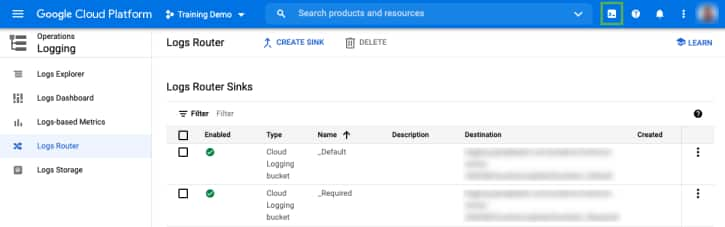
- Use the following command to create a new sink for your organization:
- Use the following command to grant the service account the permissions it requires:
gcloud logging sinks create \
	<sink-name> \
	--organization=<organization-id> \
	--include-children \
	pubsub.googleapis.com/projects/<project-name>/topics/<topic-name> \
	--log-filter "logName=(\"organizations/<organization-id>/logs/cloudaudit.
		googleapis.com%2Factivity\" OR \"organizations/<organization-id>/logs/
		cloudaudit.googleapis.com%2Fdata_access\" OR \"organizations/<organization-id>
		/logs/cloudaudit.googleapis.com%2Fsystem_event\")"
This returns the following message. Make note of the service account name (highlighted here in bold) to enter in the next step.
Created [https://logging.googleapis.com/v2/organizations/<organization_id/
	sinks/<sink_name>].
Please remember to grant `serviceAccount:<name-of-sensor-service-account>@
	<name-of-project>.iam.gserviceaccount.com.com` the Pub/Sub Publisher
	role on the topic.
More information about sinks can be found at https://cloud.google.com/logging/docs/
	export/configure_export
gcloud organizations add-iam-policy-binding <organization_id> \
	--member=<name-of-sensor-service-account>@<name-of-project>.iam.
		gserviceaccount.com> \
	--role=roles/pubsub.publisher
Configuring Export Sink Filters
The filter configured for your export sink determines which logs that sink exports to your topic.
To configure the filters for your sink
-
Go to the export sink for which you wish to create a filter.
You can do this either when you first created the export sink or by opening it any time after that for editing.
-
Click the carrot in the text box of your export filter and select Convert to advanced filter.
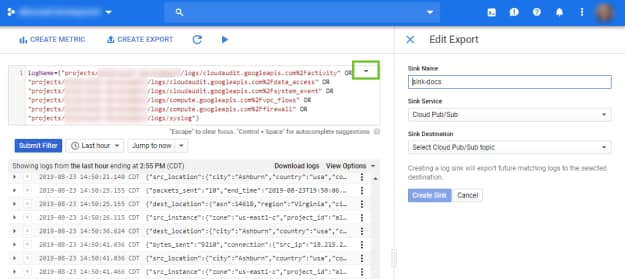
- Use the specifications described in the following table to define which filters will be exported by this sink, separating each filter specification with "OR" (as seen in the preceding image).
Note: Any logs included in your filter but not supported by the GCP Sensor will be ignored by the sensor. LevelBlue recommends including syslog in your filter to collect these unsupported logs.
The GCP Sensor relies on hints to parse syslog logs, meaning that any logs that can be assigned to a plugin will be, while the remainder will be parsed as generic events. See BlueApps and Data Sources for more information about how hints help USM Anywhere parse logs to plugins.
| Log Type | Filter to Capture This Log | Notes |
|---|---|---|
| Audit Logs at the Organization Level | organizations/<organization-id>/logs/cloudaudit.googleapis.com |
To filter these logs further, append the following:
|
|
Audit Logs at the Project Level |
projects/<project-id>/logs/cloudaudit.googleapis.com |
To filter these logs further, append the following:
|
| VPC Flow Logs | projects/<project-id>/logs/compute.googleapis.com%2Fvpc_flows | |
| Firewall Logs | projects/<project-id>/logs/compute.googleapis.com%2Ffirewall | |
| Syslog | projects/<project-id>/logs/syslog | These logs are delivered via the Stackdriver logging agent |
| Apache Logs | projects/<project-id>/logs/apache |
To filter these logs further, append the following:
|
| Nginx Logs | projects/<project-id>/logs/nginx |
To filter these logs further, append the following:
|
 Feedback